As I already told that Formidable Pro is one unique WordPress Plugin that allows us to create data-management applications (business directory, employee management, student management, patient management system, etc) with WordPress. Utilizing Formidable Pro, I have been making a decent amount of money spending a few hours a month.
Read;
How I make money with Formidable Pro
Finally, I decided to write a comprehensive post that includes a step by step tutorial to build a data display system on frontend where you and your clients (and visitors too, if you want) could search, filter and edit their data.
Pre-requisite
- Web Hosting
- WordPress (latest version)
- Formidable Pro (commercial license)
Install and configure Formidable Pro
Formidable Pro can be downloaded from its official website. Simply install and activate the plugin and then activate the pro version adding your provided license key to Formidable Pro > Global Settings
Go to Formidable Pro > Global Settings > Scroll down to bottom and set a page to see form preview
Step 1 – Build your data collection form
In this sample project we name our data collection form “Local Business”
In the data management system, everything comes after form building. We need to create a form to collect data from frontend or backend. Formidable Pro is one the best tool to generate advanced forms in a matter of seconds. It offers incredible options to customize form functionality and style as well.
— To create a form go to Formidable Pro > Forms > Add new
For instance, we need to set up a business listing website. So, we label our form “Local Business”
We add following fields to our form
- Business name (simple text field)
- Business Description (rich text field)
- Dealer name (simple text field)
- Business category (drop down, checkbox or radio button field)
- Business location (drop down, checkbox or radio button field)
- Postal address (paragraph text field)
- Phone number (simple text or phone field)
Customize Data collection (Local Business) form settings
— After creating form, we will customize its essential settings and make it to work with frontend display
— Go to Settings tab > General > Allow frontend editing of entries;
Here set
- Role required to edit one’s own entries: Logged-in users (If you don’t want to allow users to edit their entries, simply keep it option “Administrator or Editor”)
- Role required to edit other users’ entries: Editor (or Administrator as per your need)
- On submit and on update message (You can replace default messages)
Then, Go to Settings tab > Form actions > Delete default Email notification (to prevent email notification every time someone submit a form. If you essentially want email notification on entry creation or update, you can keep this default email notification and get an email to your set email address every time someone creates or updates an entry.)
Creating Essential Pages
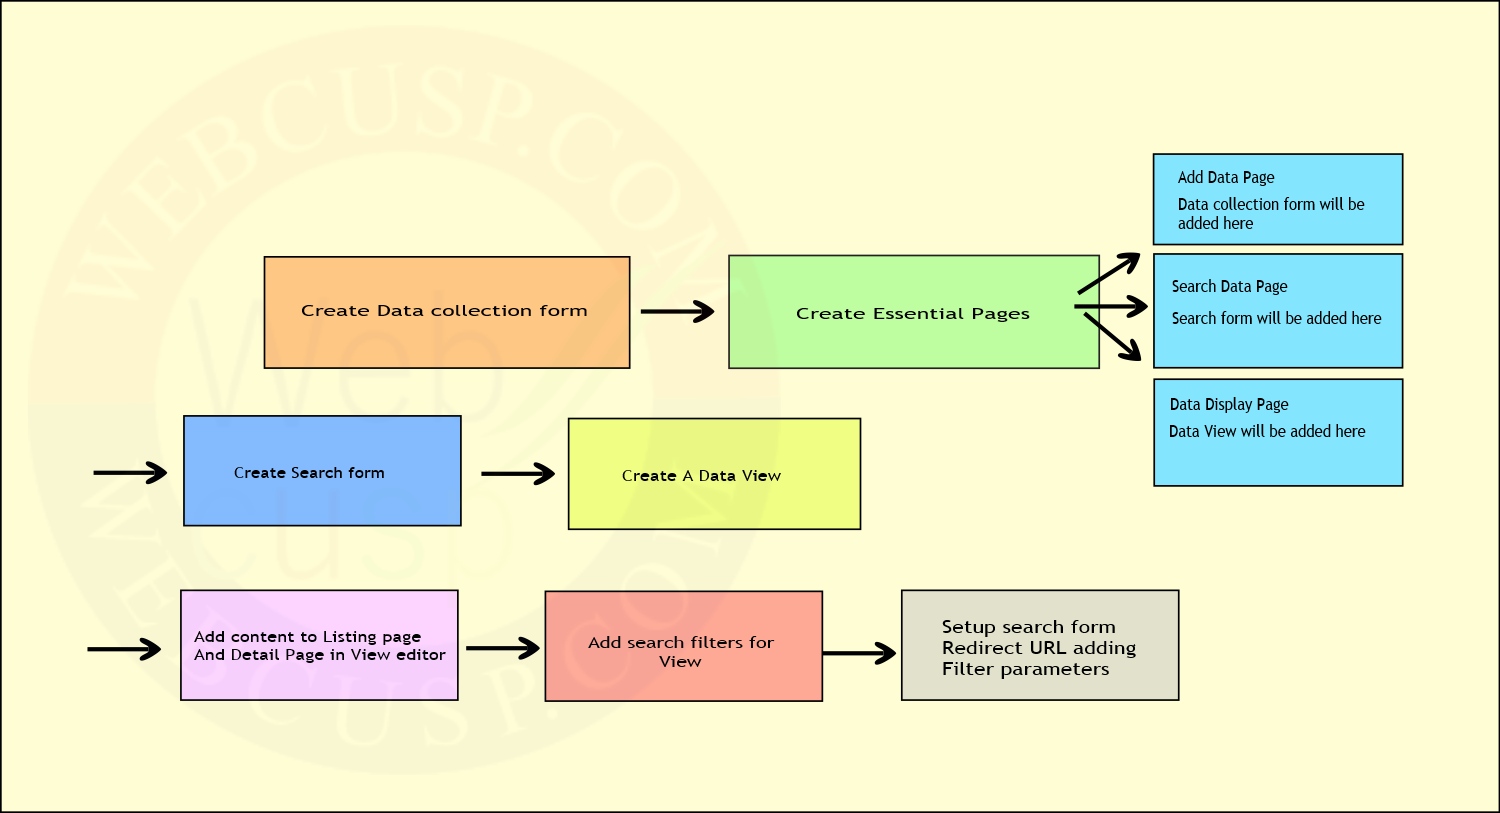
Let’s create essential pages required for frontend setup. We will create following pages;
- Add data page (where we will put data collection form. This page will be used to edit entries on frontend)
- Search data page (in this page, we will put search form)
- Data display page (this page will be used to display, edit or delete form entries)
To create these page simply go to pages > add new and then save all three pages blank just adding page title. (we will work on these pages later)
Create a search form
— Now we create a search form to filter form entries on frontend. To create a search form, go to Formidable Pro > Forms > Local Business (our data form created in previous step) > Click on duplicate button
— On duplicate form wizard, give your duplicated form name Filter Data Form
— As duplicated form contains all fields copy of Local Business, you need to keep only those fields that you want to filter entries with. For instance, we want to filter form data with Business Name, Business Category, Business Location. Simply delete all other fields from this search form and save it.
— Then, go to search form setting page and customize following settings;
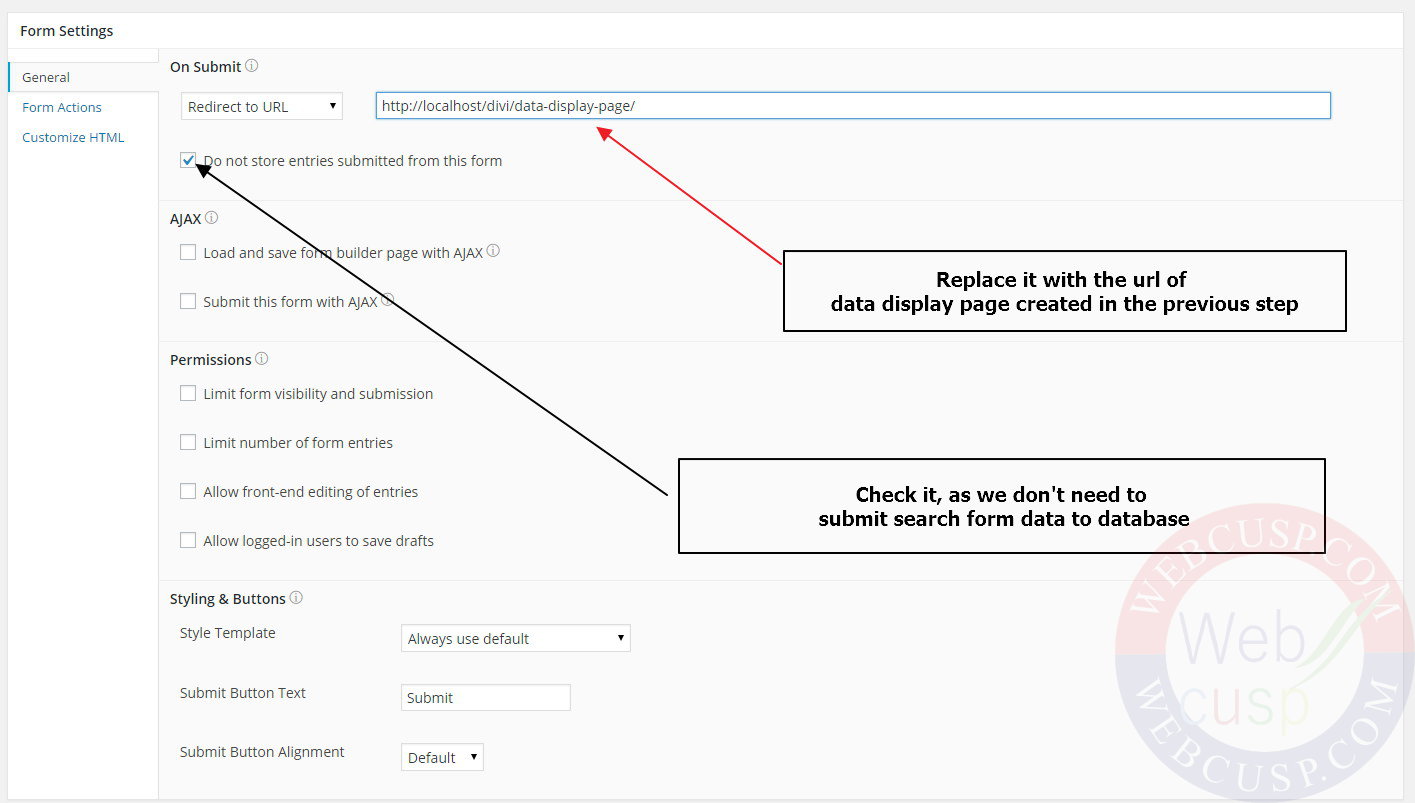
Customize general settings
In general settings tab, see what we need to change. Below is the exact settings we need.
Delete default email notification
Make sure that you have deleted default email notification in your search form. As we have copied Local Business form to create Filter Data Form that doesn’t have any default email notification, we find nothing in this section.

Create a view
It is the most important and core part of building data display system. View is a custom post type offered by Formidable Pro. The beauty of View is that we can display form entries and a single entry in a way without knowing PHP. In View editor, Fields IDs are provided and when you add a field ID in view editor, it will pull data from entries dynamically. For instance, if you add filed id of Dealer Name field, it will display dealer name per entry.
If you decide to show all or a single entry in a View, it will have only one content section i.e. Listing Page
But if you decide to show entries in dynamic form, it will have two content sections;
- Listing Page – Shows all entries in paginated form (we need to add brief detail for entries in this section)
- Detail Page – It shows single entry where you will like to add full detail regarding entries
Let’s start building the view for our Local Business form
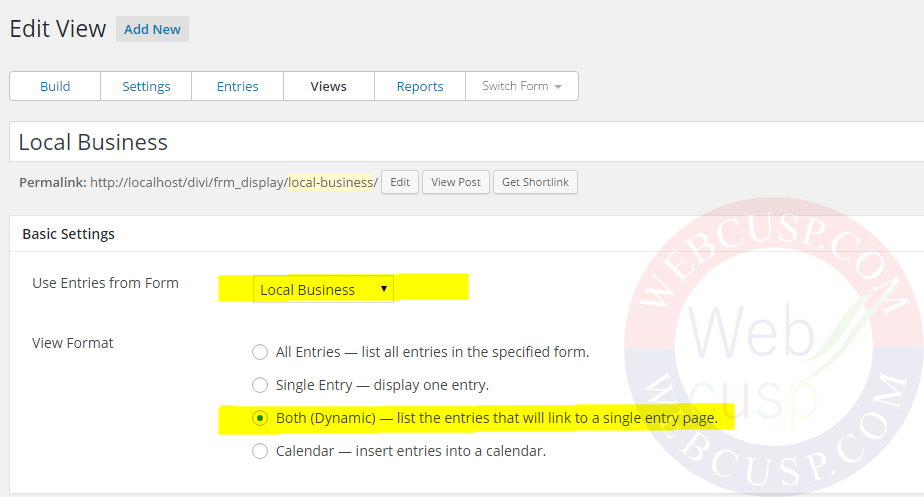
— Use Entries from Form – Local Business
— View Format – Both (Dynamic)
— Now click your mouse inside Listing Page editor and then locate Customization > Insert Fields. Here you will find the list of all fields with their IDs
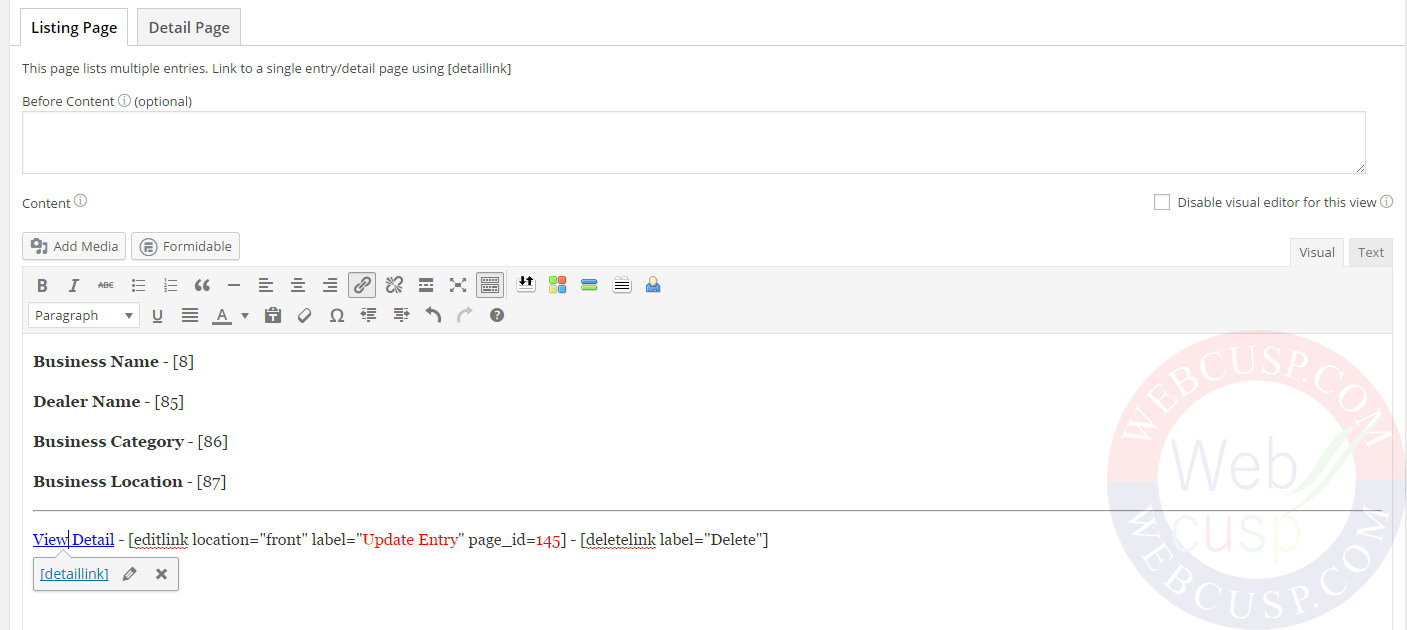
— Type field label (whatever label you want to use before field id) in Listing Page editor and then type field ID for that field. Below is the Listing Page content for our sample project
- Business Name – [8]
- Dealer Name – [85]
- Business Category – [86]
- Business Location – [87]
Keep in mind that you are free to add custom formatting using WordPress text editor and even you can add your own custom HTML and CSS to make your data view attractive and professional. Additionally, you can modify your custom text and formatting anytime in future.
— Now again go to View Editor’s right sidebar > Customization > Helpers and here click on Detail Link and Edit link button to add shortcodes for Entry Detail link and Entry Edit link. These shortcodes will be exactly like these;
Red text is the configurable part of Edit Link shortcode
You can replace red colored Edit text to anything you want
red colored x represents page id of Add Data Page (created in previous step)
How to find out the page ID of any WordPress post, page or custom post type
WordPress doesn’t show page IDs as explicit data and we need to look in to page edit link to get page ID of a specific page. To find out page ID of Add Data Page, edit it and then look into the address bar.
Note – Page ID is unique for every page, post or custom post type. So you need to check it manually for a page.
So our customized Edit link will be;
If you would require to add a delete link to your frontend data display, you need to add following shortcode wherever you want to show Delete Button;
Thus, our basic Listing page will contain following data
— Save your View and then go to Formidable Pro > Entries > Local Business > Add at least two sample entries so that we could check our created View Functionality
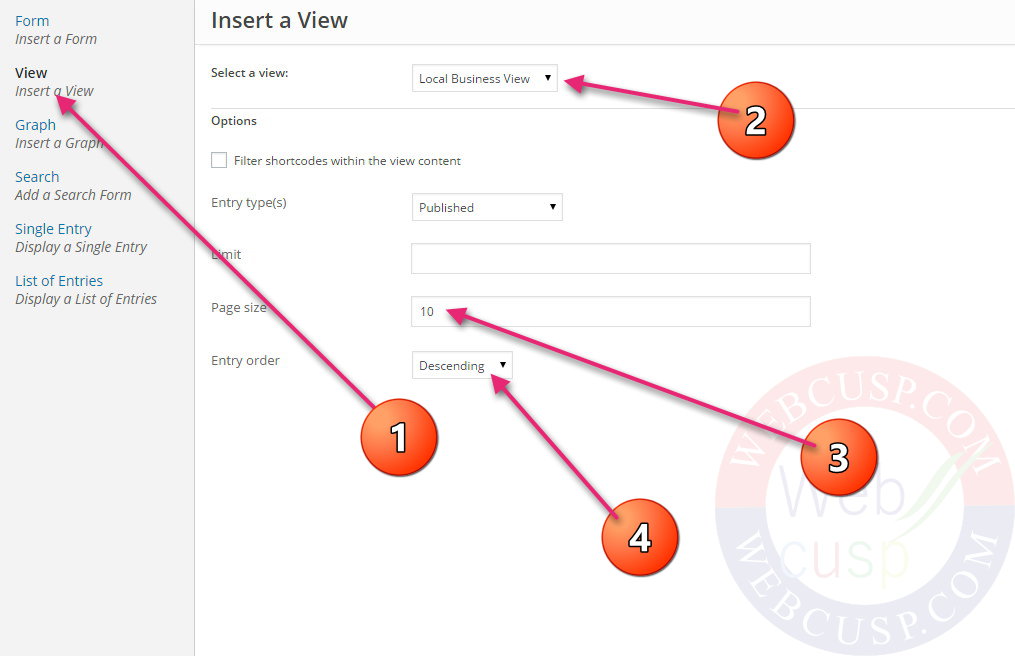
— After adding sample entries, go to pages > Data Display Page > Locate Formidable Pro button below Title editor and click on it. Select the View and customize display settings as shown in given image and then update the page.
— Now, when we preview the Data Display Page, submitted entries will look like this on this page
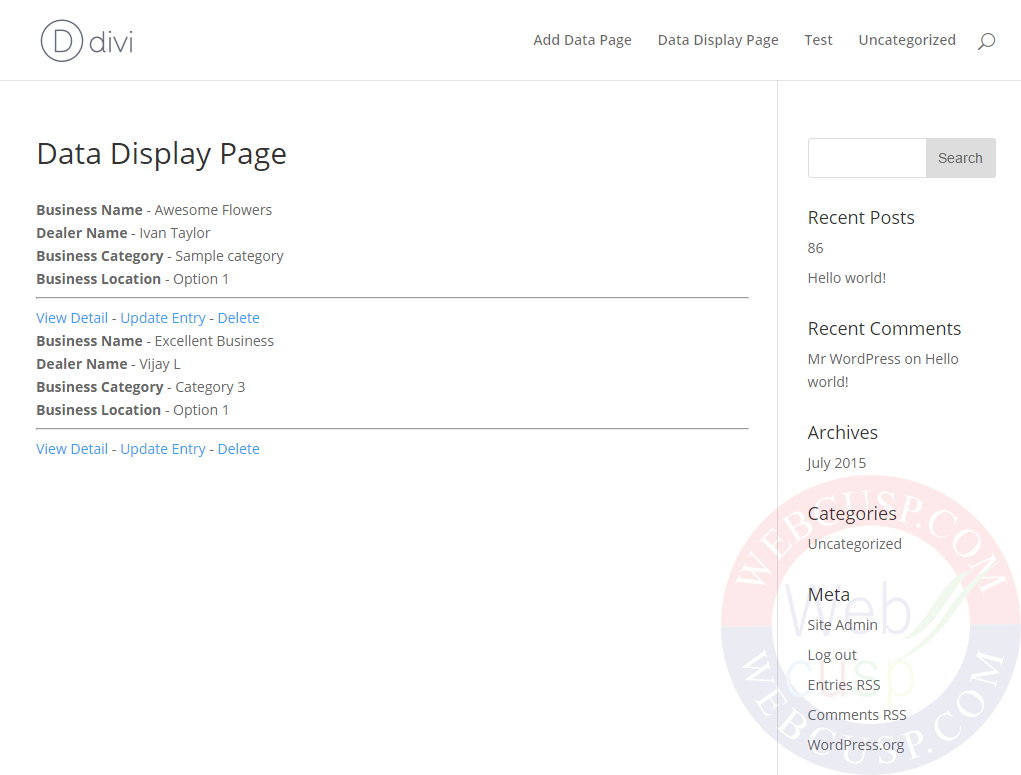
— This way, have successfully set up basic listing page. Now we will set up Entry Detail page in our View (Local Business View)
— Go to Formidable Pro > Views > Local Business View > Jump to Listing Detail Page
You can add content to listing detail page in the same way we have added content to Listing Page in the previous step. The only difference between Listing Page and Listing Detail Page is that in Listing Page you should add brief data related to your listing, on the other hand Listing Detail Page should contain all data of the listing. But you are free to add whatever you want in both content section without any restriction.
So, in our detail page, we will add all data that an entry contains. As detail link points to detail page so there is no need to keep detail link in detail page and we will remove it. Our Listing Detail pages will look like this;
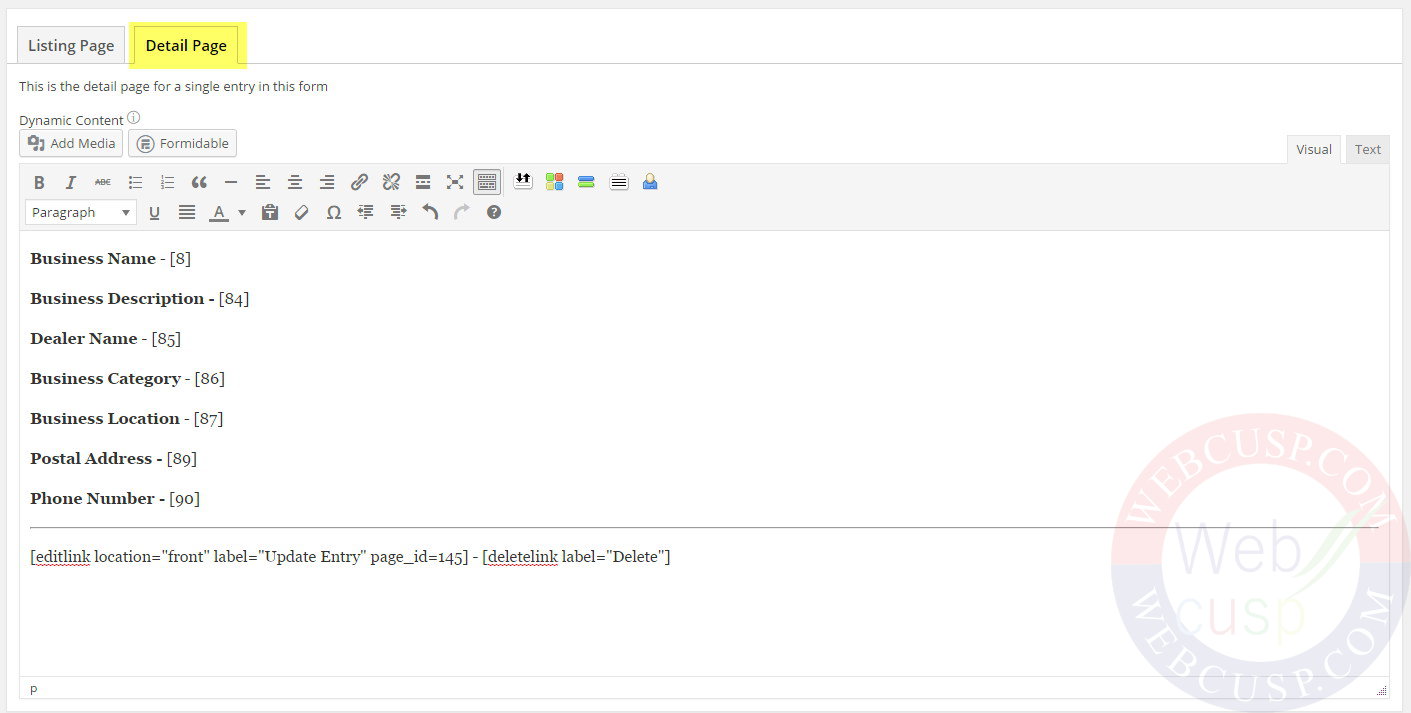
— Save the View and check it out on frontend. It should be look like this;
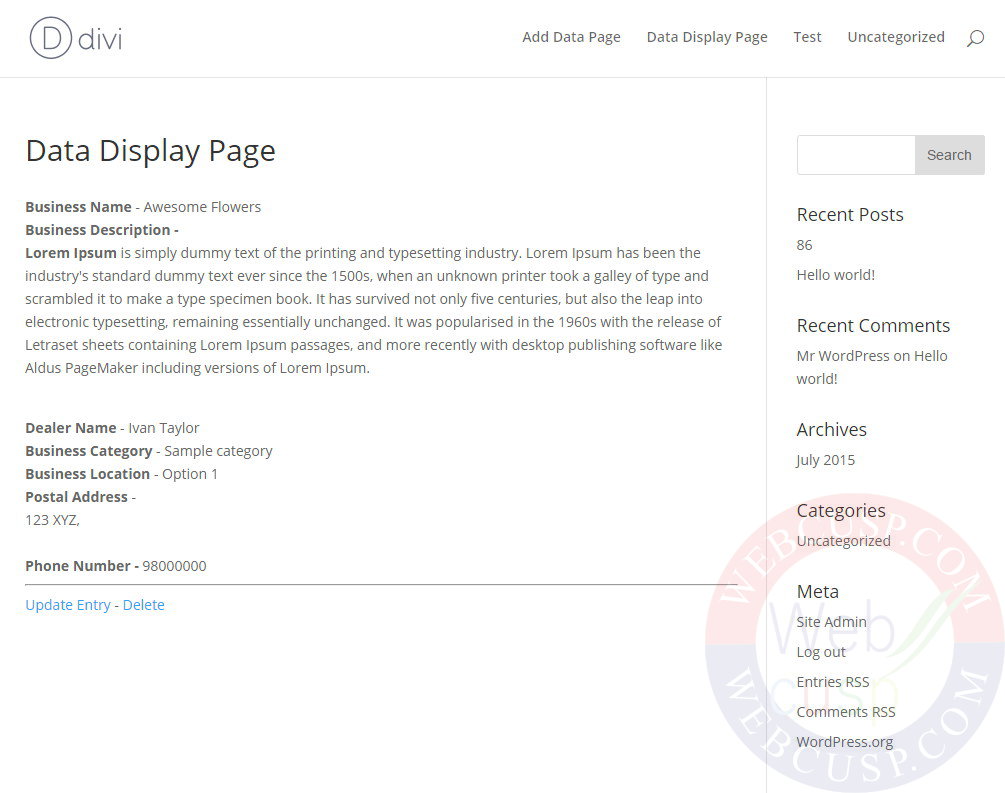
We have just finished basic setup of Detail page. Literally almost 70% work is done and now we will work with entries filtering using Filter Data Form and View’s Advanced settings section.
Setting up frontend entries filtering (advanced multi-criteria content search)
We have already created Filter Data form. Now we need to customize View’s Advanced section
Open View (Local Business View) and then scroll down to bottom. You will see Advanced Setting > Sort and Filter
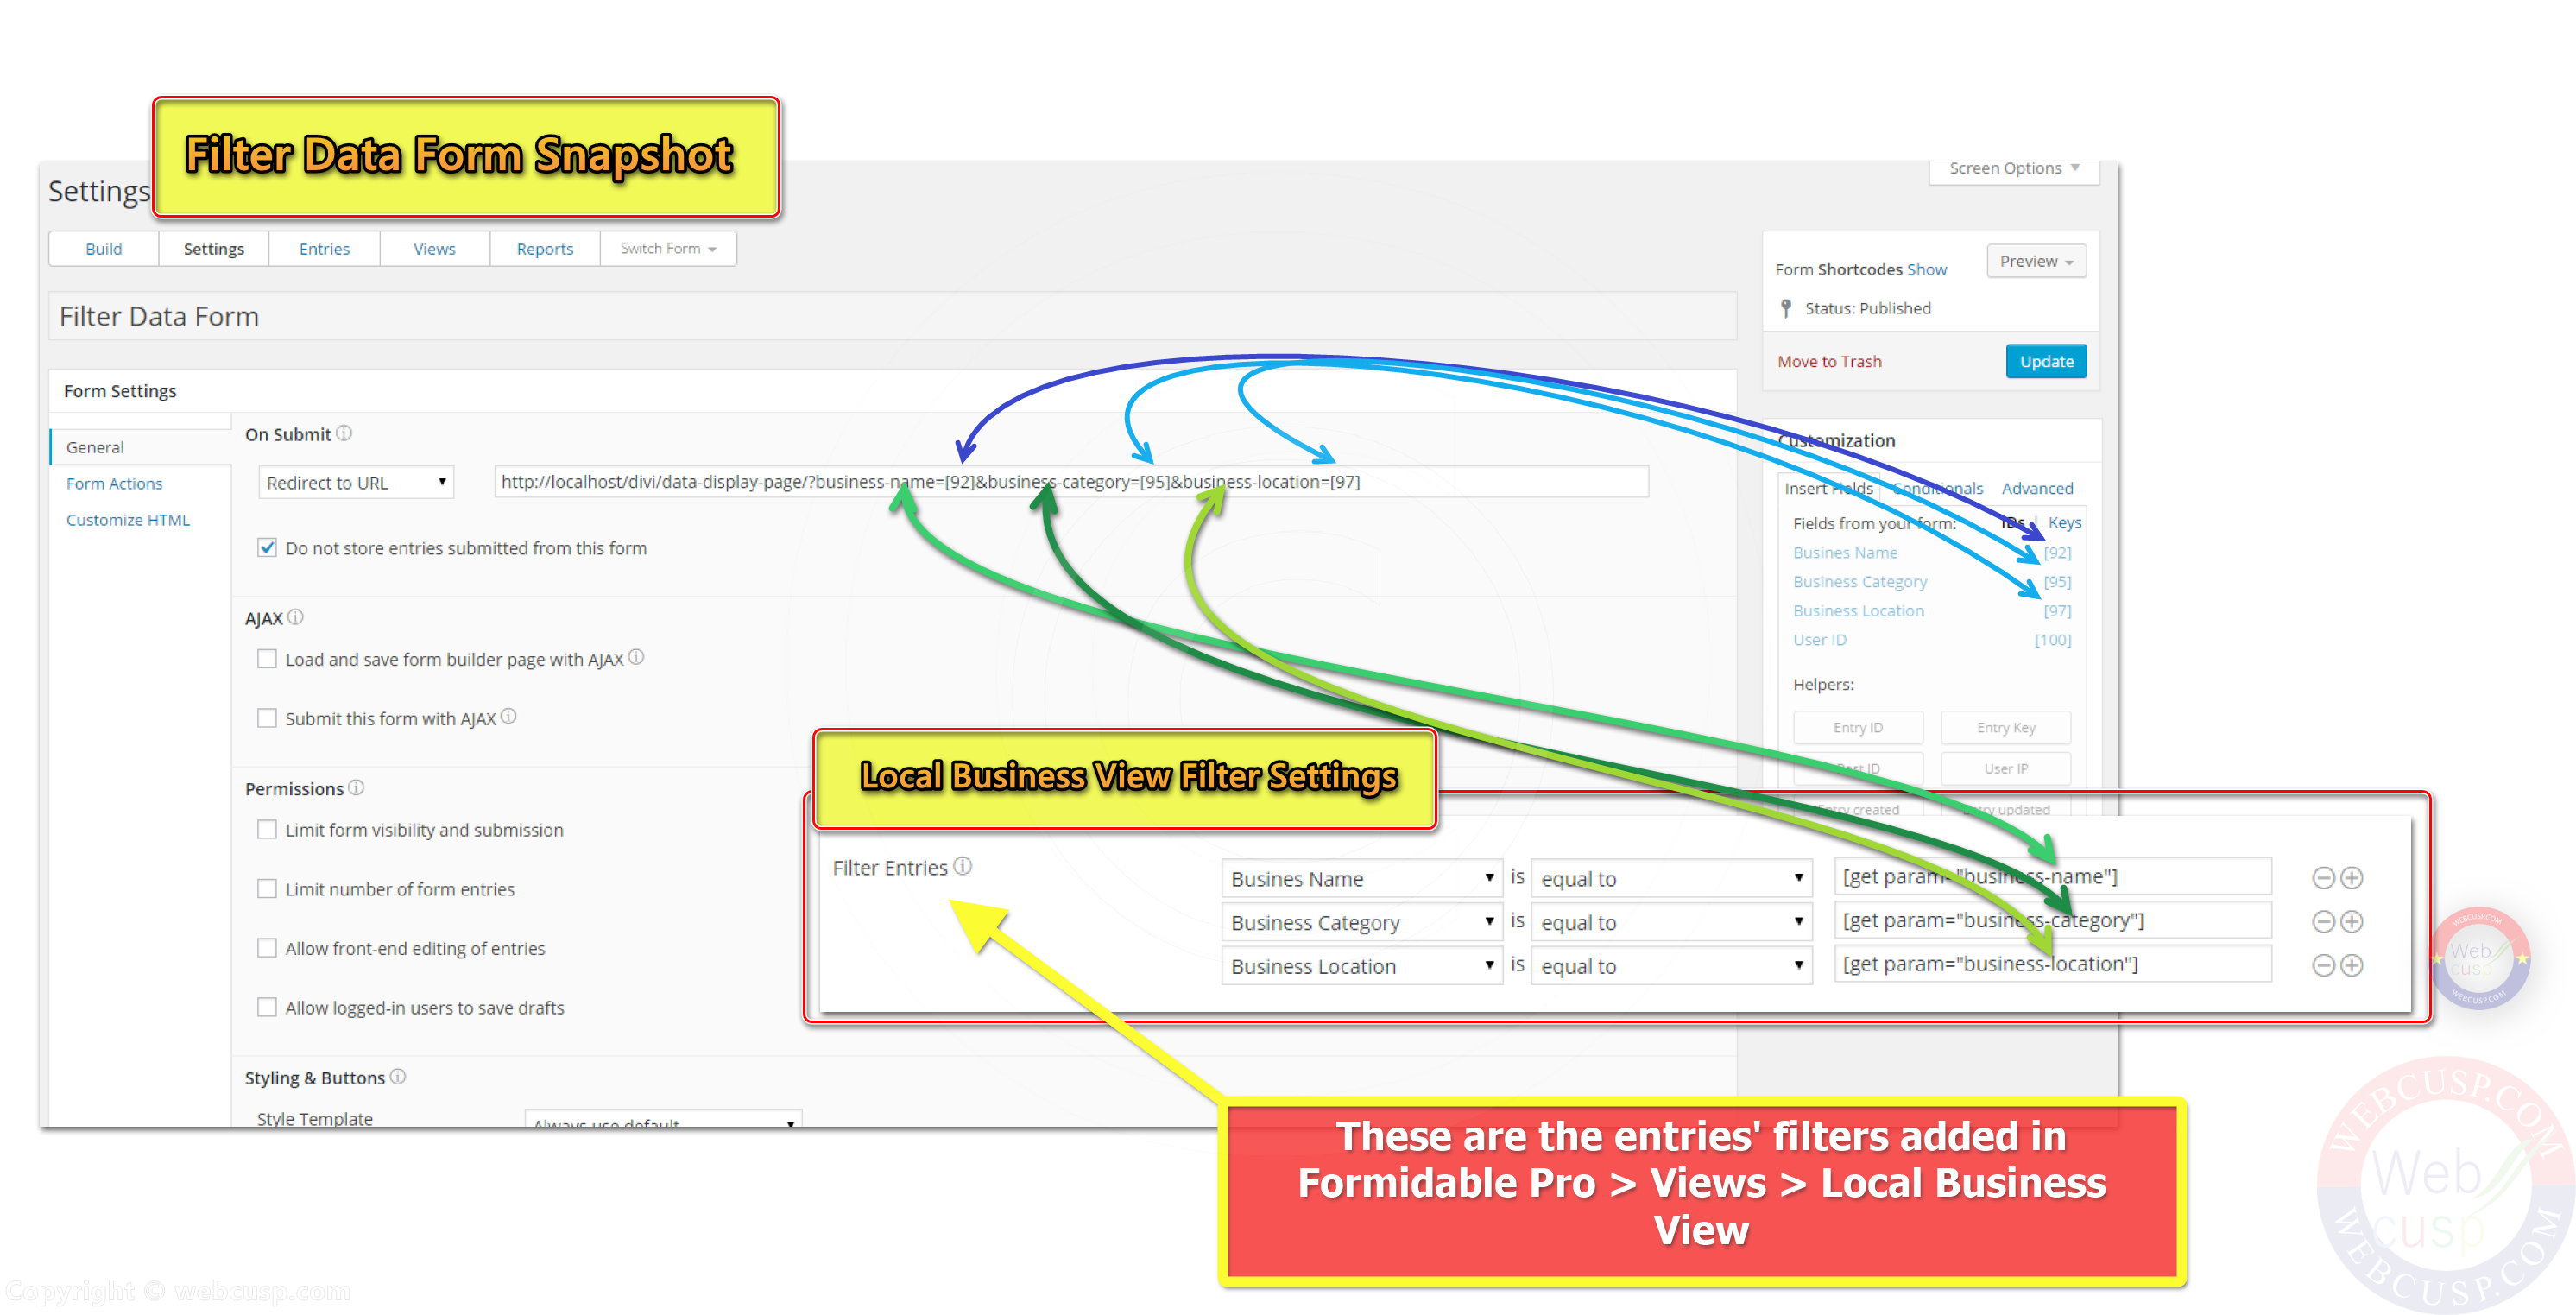
Here we will add three filters (as our Search Form contains 3 fields; Business name, Business Category and Location
- Filter for Business name – Click on Add+ button > Choose Business Name from dropdown menu > Set it equal to > [get param=”business-name”]
- Filter for Business Category – Click on + circle (located after first filter) button > Choose Business Category from dropdown menu > Set it equal to > [get param=”business-category”]
- Filter for Business Location – Click on + circle (located after previously added filter) button > Choose Business Category from dropdown menu > Set it equal to > [get param=”business-location”]
Red text is the unique parameter for every filter. You can change this text according to your own convenience (but ignore the text that uses by WordPress such as date, month etc. You can use date1 or month1 instead)
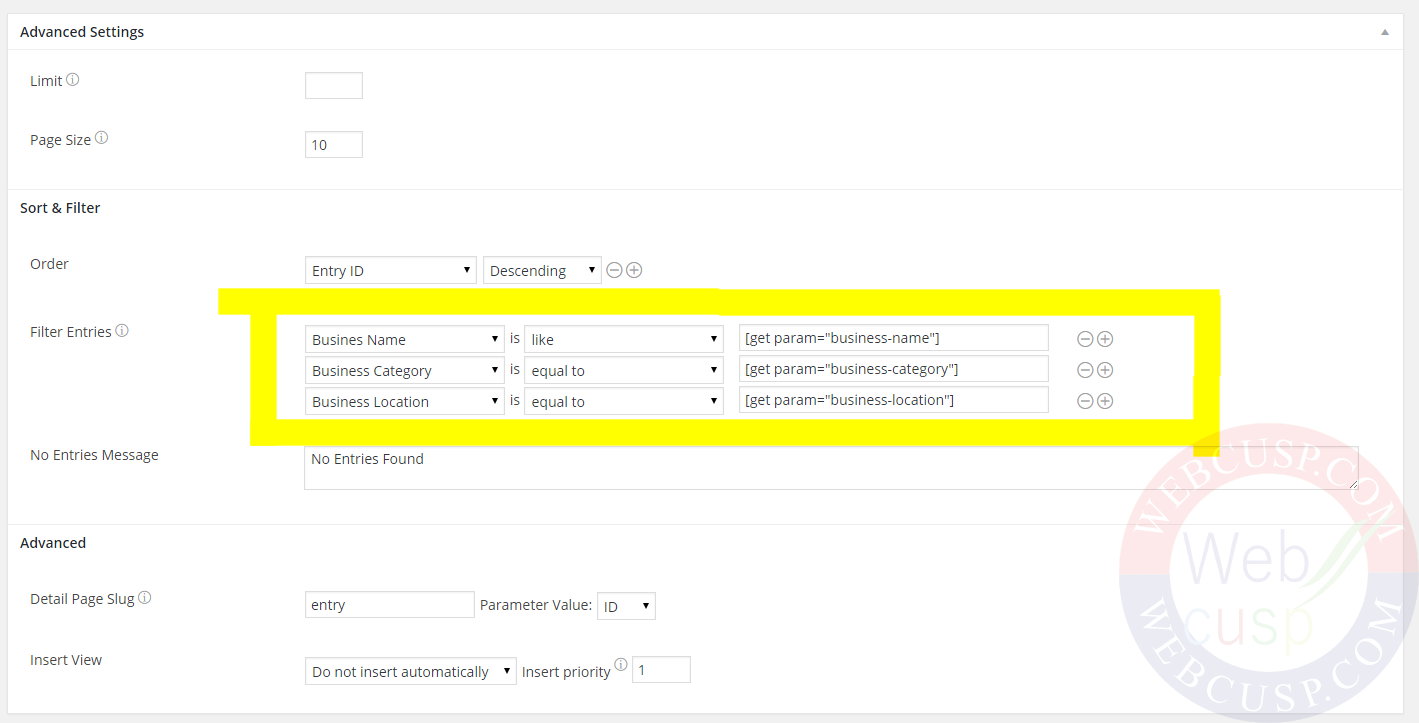
Save the View changes and then go to the Filter data form settings
In previous step we have set on submit action to “redirect to a URL and here we have added the page URL of Data Display Page. Now we will add search parameters to this URL
………../data-display-page/?business-name [92]&business-category=[95]&business-location= [97]
Red text represent filter parameters added in Data Display View and green text represents field id of same named fields in search form.
To make it more clear we can write it like;
— Now go to Pages > Search data page and add Filter data form shortcode to this page
— We are all set to filter submitted entries via Filter data form on frontend.
— Open Search data page and try searching something. We have added 2 sample entries and we will try searching some data available in these entries. For example, we have added Business Name – Awesome flowers in one of the sample entries and we search it in Business name in Search data page.
Customizing your advanced search algorithm
Formidable Pro offers flexible filtering of form data using its smart search algorithm. You can set a search filter is; equal to, no equal not, like, not like, greater than, less than, greater than or equal to, less than or equal to, starts with, ends with, unique.
— For instance if you want to allow searching a segment of a text field, you can set search field is like [parameter]
— If you want to force visitors searching all given fields, you can set all given fields as “required” in search form
Congratulation. Our essential setup to display, edit, delete and filter form entries on frontend has been accomplished.

